Pages

Sunday, 9 June 2013

Sketch book cover

 9th June 2013

Another beautiful day, I love this weather!

I have been working on my cover over the past few weeks. I have really enjoyed the process of using all the new skills from my course.

Please excuse the quality of my photos in this posting!!

I began by spraying 2 pieces of calico with dyes and a little bleach. One piece I wet and crumpled then pressed it over the other piece and used this for the lining.


When I realised handling the dyed fabric coloured my hands I decided to use a fine scrim cloth over the top! As I wanted to see some of my fabric I cut out  leaf shapes in the scrim and the fabric revealed dictated the colours of threads and yarns for the project.

Satin stitch to bind the shape edge then cable stitch in green Perla thread.


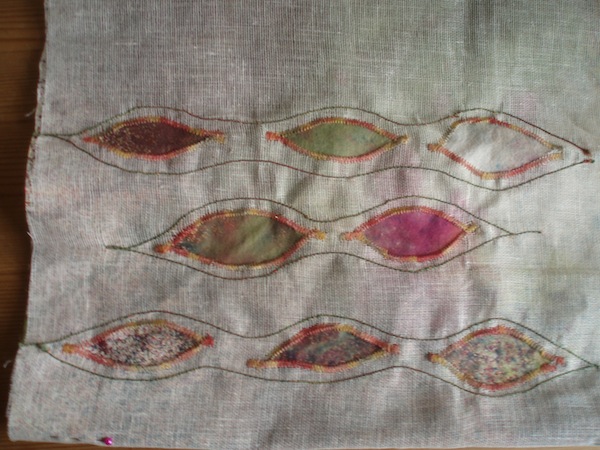
As I wanted a slightly quilted effect I placed the fabric on medium wadding and continued to stitch.

A twin needle was used in programmed feather stitch (one of my favourites) with green and variegated thread. Free machining leaf veins and pattern in spaces and couching various textured yarns.


Finished cover.


Cover on sketch book with ties made from plaited wool twine.

Friday, 7 June 2013

Update without photos!

7th June 2013

This weather is so wonderful, I can't remember the last time I said that!

Yesterday I couched various yarns on my sketch book cover ( I will post all photos when it is completed ) and today free machined and cut fabric away and generally had a very enjoyable couple of hours. 

Then I went to visit my friend Joanne with dyes, fabrics and stamps. We spent a brilliant 2 hours,  mostly in the garden experimenting with spraying various fabrics. I love spraying dyes as the end result is always a surprise. Joanne tried wetting and scrunching the calico before spraying and the results were stunning. I am afraid we were so caught up in the project we forgot to take photos!! We also sprayed silk paints and dyes on white cotton velvet (idea from Angie Hughes dvd) When it is dry it is sprayed with black ink, then bleach is dabbed on a wooden stamp and pressed on the fabric which should reveal the colours beneath, sounds really exciting-we will have to see if it works!! I will let you know or even remember to take photos. 

Must go now and make dinner.

Wednesday, 5 June 2013

Free machine Embroidery on painted fabric

5th June 2013

I was up early this morning, another lovely day, and decided to enhance a piece of painted fabric from earlier in the course.
 This design idea was from Unit 1 (white brush marks on black paper) and I commented that I didn't like it. When Anne gave me feedback she thought it would be good stitched so this was my task this morning.


I used a purple thread in straight stitch to outline the 'petal' shapes. Then used a variegated thread-yes I do really love these threads-to try to shade the petals. I tried different ideas on each flower and think I improved as I progressed. Next I stitched the stem-you know which thread- and experimented with long and short straight stitch. I would have preferred a thinner stem but had to follow the paint marks!

I thought the end result really enriched the fabric and may use it as a centre for a cushion at a later date. 


Tuesday, 4 June 2013

Fabric and stitch collage

4th June 2013

Another lovely day, the sun is shining, wispy clouds and a pleasant breeze.
My husband, Jack(our dog) and I went for a long walk along the beach-we all paddled and it was a great way to spend a couple of hours.

This afternoon I decided to attempt the task of a collage from a photo!

I chose a photo that I took at Chesil Beach at Easter, the photo conjures happy memories of time spent with my family.


I started the task with a piece of white linen, then searched for fabrics and yarns I thought my prove useful. My collection included yarns in various shades and textures, scrim(I had previously 'rusted' this fabric in an experiment with vinegar and rusty bolts), a scarf found in a charity shop and blue/white organza.

I proceeded to cut shapes in the appropriate fabric and free machined this in place. I used a twin needle with zigzag and I liked the effect until the needle broke!!

To make the pebble beach effect (hopefully) I used the scrim, thick handmade paper and 4 different threads and two yarns. The stitches I used were straight in a circular motion, and zigzag. I really enjoyed this process and it was difficult to decide when to stop!!

For the white waves I used 2 different yarns and lots of zigzag and again circular stitches. I also snipped some of the stitches and yarns to create texture. 
I enjoyed this exercise although I was dreading it!


This photo isn't very good for colour and I must admit I think the stitched picture looks better at a distance and might frame it when it has been assessed.

Monday, 3 June 2013

Sketchbook work

3rd June 2013

No sewing today!

I really needed to put some of my work in my sketchbook. 

I used a file and poly pockets for Unit 1 and Anne Griffiths (textile artist who runs the online course) suggested I might like to try a book next time and I must admit I prefer this method of recording my 'textile journey'. Also I use the back pages for ideas from magazines, exhibitions etc. Useful as everything is in one place. 

I am in the process of making a cover and it will need strong ties as my book is very fat with samples!


Sunday, 2 June 2013

Cable stitching

2nd June 2013

My course describes cable stitch as 'cable stitch is made by winding a heavy thread (that cannot be threaded through the needle) onto the bobbin and working with the reverse side of the fabric uppermost. You will not be able to see what you are stitching, which makes a lovely surprise when you take the fabric from the machine and turn it over. 

Well, my first attempt was NOT a lovely surprise!! lots and lots of huge loops so then I played with the top tension for quite a while, definitely trial and error, but finally managed to produce something I was quite pleased with. This process took 3 hours with numerous cups of coffee. Luckily I didn't need to alter the bobbin tension, I must get a spare case for when I use a thicker thread. I used perla embroidery thread with different top threads to see the effect.


  My early attempts using pale blue variegated perla thread and variegated top thread. I have shown the back then the front. I also found I needed to stitch fairly slowly when making circles as when I went faster the top thread was pulled through-I like the effect but don't think it is right!


My final piece this morning is stitched on calico. I tried dyeing on wet fabric with the powder and spread some out with a fine brush. I was really pleased with it and took a photo to show when the fabric was wet.


This is the same piece dry!! not so good.


I used this to do my cable stitch and liked the finished result-I want to sew beads in the centre, may do that at a later date.


All for now, the grass needs cutting and the dog needs walking!!


Saturday, 1 June 2013

Machine programmed stitches and weaving

1st June 2013

Today I thought I had better have another look at my Unit 2 instructions and realised I had digressed a little so now am back on course!

I used the last of the dyed muslin to try out the programmed stitches on my new machine(my other expired after 25 years) As the muslin was very fine I stitched it onto some thermal lining I had which is quite thick, I was hoping for a quilted effect. It was a great exercise to choose the stitches and try them out in different widths and lengths in a variety of threads.  The photo shows just half of the fabric and isn't very clear, the other piece was very blurry.


Next I cut off a length of the stitched fabric to put in my sketch book with the number of the stitch beside each row as a sample. I cut the remainder in half and cut strips for weaving.


I then stitched along the edges using variegated thread and various zigzag stitches. I am fairly pleased with the result but would not use such a thick base fabric next time as the piece is very 'solid' almost like a table mat!! I really like using variegated threads and am building up a collection.


I then used the last piece of brightly coloured calico. I ironed it onto Bondaweb, cut it out in wavy lines then ironed these pieces onto a fine scrim. When I stitched these on in close zigzag and variegated thread the scrim was slightly distorted and I liked this surprise effect. I might mount this piece for a picture.